Snekboard's Crowd Supply Campaign
Snekboard has garnered a lot of interest from people who have seen it in operation. Josh Lifton, a fellow Portland resident and co-founder of Crowd Supply, suggested that perhaps we could see how much interest there was for this hardware by building a campaign.
Getting Things Together
We took pictures, made movies, built spreadsheets full of cost estimates and put together the Snekboard story, including demonstrations of LEGO models running Snek code. It took a couple of months to get ready to launch.
Launching the Campaign
The Snekboard campaign launched while I was at LCA getting ready to talk about snek.
Interest is Strong
We set a goal of $4000, which is enough to build 50 Snekboards. We met that goal after only two weeks and still have until the first of March to get further support.
Creating Teaching Materials
We've been teaching programming in our LEGO robotics class for a long time. I joined the class about 15 years ago and started with LEGO Logo on an Apple II, and more recently using C++ with Arduino hardware.
That's given us a lot of experience with what kinds of robots work well and what kinds of software the students are going to be able to understand and enjoy experimenting with. We've adapted the models and software to run on Snekboard using Snek and have started writing up how we're teaching that and putting those up on the sneklang.org documentation page.
Free Software / Free Hardware
All of the software running on Snekboard is free; Snek is licensed under the GPL, Circuit Python uses the MIT license.
The Snekboard designs are also freely available; that uses the TAPR Open Hardware License.
All of the tools we use to design snekboard are also free; we use gEDA project tools.
Hardware and software used in education need to be free and open so that people can learn about how they work, build modified versions and share those with the world.
Linux.conf.au 2020
I just got back from linux.conf.au 2020 on Saturday and am still adjusting to being home again. I had the opportunity to give three presentations during the conference and wanted to provide links to the slides and videos.
Picolibc
My first presentation was part of the Open ISA miniconf on Monday. I summarized the work I've been doing on a fork of Newlib called Picolibc which targets 32- and 64- bit embedded processors.
Snek
Wednesday morning, I presented on my snek language, which is a small Python designed for introducing programming in an embedded environment. I've been using this for the last year or more in a middle-school environment (grades 5-7) as a part of a LEGO robotics class.
X History and Politics
Bradley Kuhn has been encouraging me to talk about the early politics of X and how that has shaped my views on the benefits of copyleft licenses in building strong communities, especially in driving corporate cooperation and collaboration. I would have loved to also give this talk as a part of the Copyleft Conference being held in Brussels after FOSDEM, but I won't be at that event. This talk spans the early years of X, covering events up through 1992 or so.
Snekboard v0.2 Update
I've built six prototypes of snekboard version 0.2. They're working great and I'm happy with the design.
New Motor Driver
Having discovered that the TI DRV8838 wasn't up to driving the Lego Power Functions Medium motor (8883) because of it's start-up current draw, I went back and reworked the snekboard circuit to use TI DRV8800 instead. That controller can provide up to 2.8A and doesn't have any trouble with this motor.
The DRV8800 is larger than the DRV8838, so it took a bit of re-wiring to fit them on the circuit board.
New Power Source Selector
In version 0.1, I was using two DFLS130L Schottky diodes to automatically select between the on-board lithium polymer battery and USB to power the board. That "worked", except that there was enough leakage back through them that when the USB connector was unplugged, the battery charge indicator LEDs both lit up, which left me with the choice of disabling those indicators or draining the battery.
To fix that, I found an automatic power selector (with current limit!) part, the TPS2121. This should avoid frying the board when you short the motor controller outputs, although those also have current limiting circuits. Defense in depth!
One issue I found was that this circuit draws current even when the output is disconnected, so I changed the power switch from a SPST to DPST and now control USB and battery power separately.
CircuitPython
I included a W25Q16 2MB NOR flash chip on the board so that it could also run CircuitPython. Before finalizing the design, I thought it might be a good idea to actually get that running.
I've submitted a pull request with the necessary changes. I hope to see that merged at some point, which will allow users to select between CircuitPython and snek.
Smoothing Speed Changes
While the 9V supply on snekboard is designed to supply plenty of current for the motors, if you ask it to suddenly change how much it is producing, it places a huge load on the battery. When this happens, the battery voltage drops below the brown-out value for the SoC and the board resets.
I experimented with how to resolve this by ramping the power up and down in the snek application. That worked great; the motors could easily switch from full speed in one direction to full speed in the other direction.
Instead of having users add code to every snek application, I decided to move this functionality down into the snek implementation. I did this by modifying the PWM and direction pins values in a function called from the timer interrupt. This lets the application continue to run at full speed, while the motor controller slowly adjusts its output. No more resets when switching from full forward to full reverse.
Future Plans
I've got the six v0.2 prototypes that I'll be able to use in for the upcoming class year, but I'm unsure of whether there would be enough interest in the broader community to have more of them made. Let me know if you'd be interested in purchasing snekboards; if I get enough responses, I'll look at running them through Crowd Supply or similar.
SnekBoard and Lego
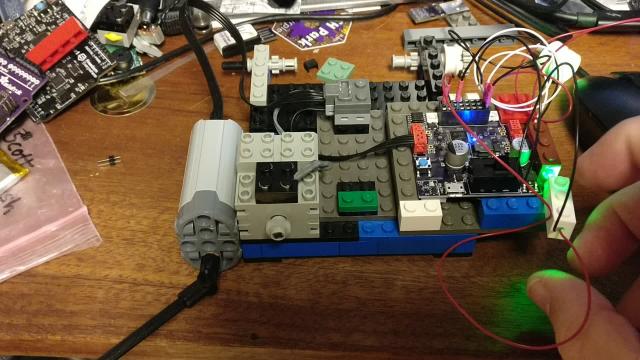
I was hoping to use some existing boards for snek+Lego, but I haven't found anything that can control 9V motors. So, I designed SnekBoard.
(click on the picture to watch the demo in motion!)
Here's the code:
def setservo(v):
    if v < 0: setleft(); v = -v
    else: setright()
    setpower(v)

def track(sensor,motor):
    talkto(motor)
    setpower(0)
    setright()
    on()
    while True:
        setservo(read(sensor) * 2 - 1)

track(ANALOG1, MOTOR2)
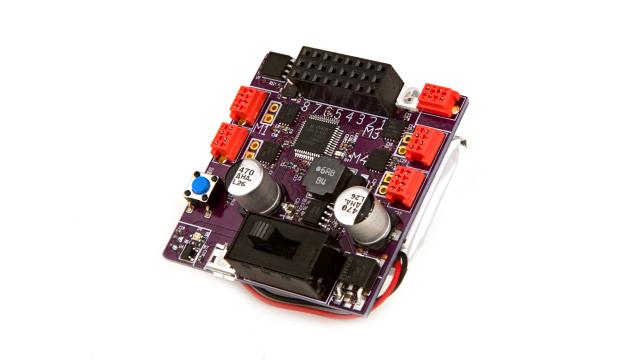
SnekBoard Hardware
SnekBoard is made from:
SAMD21G18A processor. This is the same chip found in many Arduino boards, including some from Adafruit. It's a ARM Cortex M0 with 256kB of flash and 32kB of RAM.
Lithium Polymer battery. This uses the same connector found on batteries made by SparkFun and Adafruit. There's a battery charger on the board powered from USB so it will always be charging when connected to the computer.
9V boost power supply. Lego motors for the last many years have run on 9V. Instead of using 9V worth of batteries, using a boost regulator means the board can run off a single cell LiPo.
Four motor controllers for Lego motors and servos. The current boards use a TI DRV9938, which provides up to 1.5A.
Two NeoPixels
Eight GPIOs with 3.3V and GND available for each one.
One blue LED.
Getting SnekBoard Built
The SnekBoard PCBs arrived from OshPark a few days ago and I got them assembled and running. OshPark now has an associated stencil service, and I took advantage of that to get a stainless stencil along with the boards. The DRV8838 chips have small enough pads enough that my home-cut stencils don't work reliably, so having a 'real' stencil really helps. I ordered a 4mil stencil, which was probably too thick. They offer 3mil, and I think that would have reduced some of the bridging I got from having too much paste on the board.
Flashing a Bootloader on SnekBoard
I forked the Adafruit UF2 boot loader and added definitions for this board. The version of GCC provided in Debian appears to generate larger code than the newest upstream version, so I wasn't able to add the NeoPixel support, but the boot loader is happy enough to use the blue LED to indicate status.
STLink V2 vs SAMD21
I've got an STLink V2 SWD dongle which I use on all of my Arm boards for debugging. It appears that this device has a limitation in how it can access memory on the target; it can either use 8-bit or 32-bit accesses, but not 16-bit. That's usually just fine, but there's one register in the flash memory controller on the SAMD21 which requires atomic 16-bit accesses.
The STLinkV2 driver for OpenOCD emulates 16-bit accesses using two 8-bit accesses, causing all flash operations to fail. Fixing this was pretty simple, the 2 bytes following the relevant register aren't used, so I switched the 16-bit access to a 32-bit access. That solved the problem and I was able to flash the bootloader. I've submitted an OpenOCD patch including this upstream and pushed the OpenOCD fork to github.
Snek on the SnekBoard
Snek already supports the target processor; all that was needed for this port was to describe the GPIOs and configure the clocks. This port is on the master branch of the snek repository.
All of the hardware appears to work correctly, except that I haven't tested the 16MHz crystal which I plan to use for a more precise time source.
SnekBoard and Lego Motors
You can see a nice description of pretty much every motor Lego has ever made on Philo's web site. I've got a small selection of them, including:
- Electric Technic Mini-Motor 9v (71427)
- Power Functions Medium motor (8883)
- Power Functions Large motor (88003)
- Power Functions XL motor (8882)
- Power Functions Servo Motor 88004
In testing, all of them except the Power Functions Medium motor work great. That motor refused to start and just sat on the bench whinging (at about 1kHz). Reading through the DRV8838 docs, I discovered that if the motor consumes more than about 2A for more than 1µs, the chip will turn off the output, wait 1ms and try again.
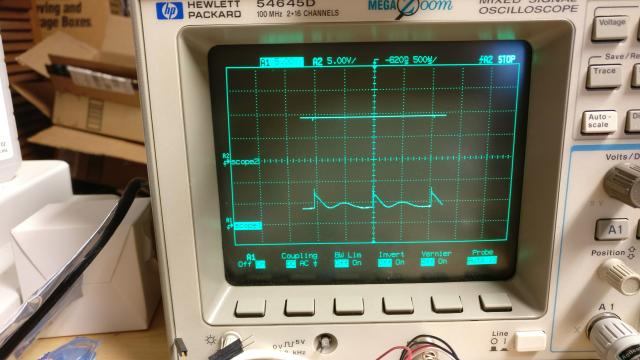
So I hooked the board up to my oscilloscope and took a look and here's what I saw:
The upper trace is the 9V rail, which looks solid. The lower trace is the motor control output. At 500µs/div, you can see that it's cycling every 1ms, just like the chip docs say it will do in over current situations.
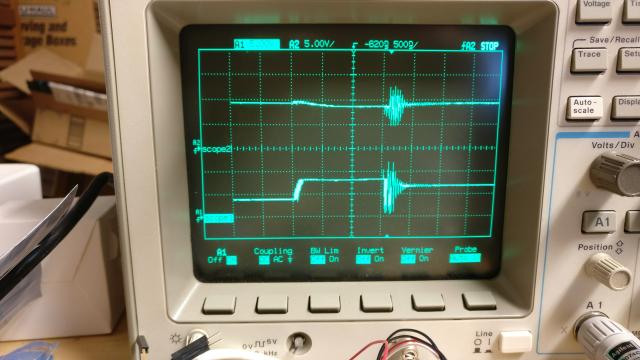
I zoomed in to the very start of one of the cycles and saw this:
This one is scaled to 500ns/div, and you can see that the power is high for a bit more than 1µs, and then goes a bit wild before turning off.
So the Medium motor draws so much current at startup that the DRV8838 turns it off, waits 1ms and tries again. Hence the 1kHz whine heard from the motor.
I tried to measure the current going into the motor with my DVM, but when I did that, just the tiny additional resistance from the DVM caused the motor to start working (!).
Swapping out the Motor Controller
I spent a bunch of time looking for a replacement motor controller; the SnekBoard is a bit special as I want a motor controller that takes direction and PWM instead of PWM1/PWM2, which is what you usually find on an H-bridge set. The PWM1/PWM2 mode is both simpler and more flexible as it allows both brake and coast modes, but it requires two PWM outputs from the SoC for each controller. I found the DRV8876, which provides 3.5A of current instead of 1.5A. That "should" be plenty for even the Medium motor.
Future Plans
I'll get new boards made and loaded to make sure the updated motor controller works. After that, I'll probably build half a dozen or so in time for class this October. I'm wondering if other people would like some of these boards, and if so, how I should go about making them available. Suggestions welcome!
Snek 1.0
I've released version 1.0 of Snek today.
Features
Python-inspired. Snek is a subset of Python: learning Snek is a great way to start learning Python.
Small. Snek runs on an original Arduino Duemilanove board with 32kB of ROM and 2kB of RAM. That's smaller than the Apollo Guidance Computer
Free Software. Snek is licensed under the GNU General Public License (v3 or later). You will always be able to get full source code for the system.
Ports
- Adafruit Crickit
- Arduino Duemilanove
- Adafruit Feather M0 Express
- Adafruit ItsyBitsy (both 3v and 5v versions)
- Adafruit ItsyBitsy M0 Express
- Arduino Mega
- Adafruit Metro M0 Express
- Adafruit Circuit Playground Express
Hosts
Documentation
Read the Snek manual online or in PDF form:
Snek Adopts More Python Scoping
Python's implicit variable declarations are tricky and Snek had them slightly wrong. Fixing this meant figuring out how they work in Python, then figuring out the simplest possible expression to make the result fit in the ROM.
Local Variable Declaration
Local variables are declared in Python either as formal parameter names, or by placing them on the left hand side of a simple assignment operator:
def foo(a, b):
    c = 12
    return a + b + c
There are three local variables in function foo — a, b and c.
Global Variable Declaration
Global variables are declared in Python in one of two ways:
1) A simple assignment at global scope
2) A simple assignment in a function which also has a 'global' statement including the same name
a = 12

def foo(c):
    global b
    b = c
This defines both 'a' and 'b' as globals.
Global Variable Usage
Global variables can be used within functions without explicitly declaring them.
a = 12

def foo(c):
    return a + c
You may be explicit about a's scope using a 'global' statement
a = 12

def foo(c):
    global a
    return a + c
These two forms are equivalent, unless you also include an assignment expression with a on the LHS (left hand side):
a = 12

def foo(c):
    a = 13
    return a + c
is not the same as
a = 12

def foo(c):
    global a
    a = 13
as the former declares a new local, 'a', and leaves the global unchanged while the latter changes the global value.
Local Variable Usage
Python3 does whole-function analysis to figure out whether a name is local or not. If there is any assignment of a name within a function, that name references a local variable. Consider the following:
a = 12

def foo(c):
    b = a + c
    return b

def bar(c):
    b = a + c
    a = 1
    return b
The function 'foo' references the global named 'a', while the function 'bar' attempts to reference the local named 'a' before it has been assigned a value and, hence, generates an error.
Snek doesn't do this whole-function analysis, so 'bar' uses the global 'a' in the first statement as it hasn't yet reached the definition of 'a' as a local variable.
Augmented Assignments
Python Augmented Assignment statements are similar to C's Compound assignment operators — +=, *=, /=, etc. The Python reference has this to say about them:
"An augmented assignment expression like x += 1 can be rewritten as x = x + 1 to achieve a similar, but not exactly equal effect."
Because they work similar to assignment statements, they can declare a new variable in the current scope, if no such name has been included in previous assignment, global or non-local statements. Also, because they reference the variable on the RHS (right hand side), they need that variable to have already been defined before this statement executes.
Scoping in Snek
Because Snek doesn't do whole-function analysis, it can't 'see' later assignments in a function, and so a function with a use-before-assignment generates the following (non-Pythonic) result:
a = 12

def foo(c):
    b = a + c
    a = 1
    return b

> foo(13)
25
Fixing this would require additional tracking within the compiler, which I may add at some point, but for now, saving memory during compilation seems useful.
Snek Augmented Assignments
While Snek doesn't currently handle the general case of use-before-assignment involving separate statements, the simpler case with augmented assignments doesn't require saving any state during compilation and seems like something more useful to catch as without it, you would get:
a = 12

def foo(c):
    a += c
    return a

> foo(13)
25
> a
12
The value of 'a' is left as 12 because the augmented assignment fetches 'a' first, which finds the global variable 'a', but then when it assigns the resulting value, it creates a new local variable 'a', just as if this code looked like:
a = 12

def foo(c):
    b = a + c
    return b
Checking this case requires adding a special-case for augmented assignment within a function to see if the name has been declared or included in 'global' statement in the function.
ItsyBitsy Snek — snek on the Adafruit ItsyBitsy
I got an ItsyBitsy board from Adafruit a few days ago. This board is about as minimal an Arduino-compatible device as I can imagine. All it's got is an Atmel ATmega 32U4 SoC, one LED, and a few passive components.
I'd done a bit of work with the 32u4 under AltOS a few years ago when Bdale and I built a 'companion' board called TeleScience for TeleMetrum to try and measure rocket airframe temperatures in flight. So, I already had some basic drivers for some of the peripherals, including a USB driver.
USB Adventures
The 32u4 USB hardware is simple, and actually fairly easy to use. The AltOS driver used a separate thread to manage the setup messages on endpoint 0. I didn't imagine I'd have space for threading on this device, so I modified that USB driver to manage setup processing from the interrupt handler. I'd done that on a bunch of other USB parts, so while it took longer than I'd hoped, I did manage to get it working.
Then I spent a whole bunch of time reducing the code size of this driver. It started at about 2kB and is now almost down to 1kB. It's a bit less robust now; hosts sending odd setup messages may get unexpected results.
The last thing I did was to add a FIFO for OUT data. That's because we want to be able to see ^C keystrokes even while Snek is executing code.
Reset as longjmp
On the ATmega 328P, to reset Snek, I just reset the whole chip. Nice and clean. With integrated USB, I can't reset the chip without losing the USB connection, and that would be pretty annoying. Resetting Snek's state back to startup would take a pile of code, so instead, I gathered all of the snek-related .data and .bss variables by changing the linker script. Then, I wrote a reset function that does pretty much what the libc startup code does and then jumps back to main:
snek_poly_t
snek_builtin_reset(void)
{
    /* reset data */
    memcpy_P(&__snek_data_start__,
         (&__text_end__ + (&__snek_data_start__ - &__data_start__)),
          &__snek_data_end__ - &__snek_data_start__);

    /* reset bss */
    memset(&__snek_bss_start__, '\0', &__snek_bss_end__ - &__snek_bss_start__);

    /* and off we go! */
    longjmp(snek_reset_buf, 1);
    return SNEK_NULL;
}
I still need to write code to reset the GPIO pins.
Development Environment
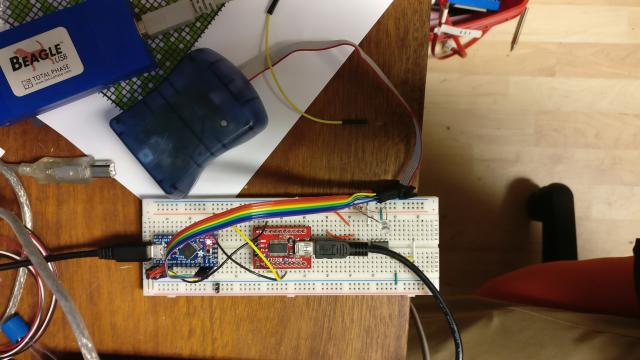
To flash firmware to the device, I stuck the board into a proto board and ran jumpers from my AVRISP cable to the board.
Next, I hooked up a FTDI USB to Serial converter to the 32u4 TX/RX pins. Serial is always easier than USB, and this was certainly the case here.
Finally, I dug out my trusty Beagle USB analyzer. This lets me see every USB packet going between the host and the device and is invaluable for debugging USB issues.
You can see all of these pieces in the picture above. They're sitting on top of a knitting colorwork pattern of snakes and pyramids, which I may have to make something out of.
Current Status
Code for this part is on the master branch, which is available on my home machine as well as github:
I think this is the last major task to finish before I release snek version 1.0. I really wanted to see if I could get snek running on this tiny target. It's nearly there; I want to squeeze a few more things onto this chip.
Snek and Neopixels
(click on the picture to see the movie)
Adafruit sells a bunch of things using the Neopixel name that incorporate Worldsemi WS2812B full-color LEDs with built-in drivers. These devices use a 1-wire link to program a 24-bit rgb value and can be daisy-chained to connect as many devices as you like using only one GPIO.
Bit-banging Neopixels
The one-wire protocol used by Neopixels has three signals:
- Short high followed by long low for a 0 bit
- Long high followed by a short low for a 1 bit
- Really long low for a reset code
Short pulses are about 400ns, long pulses are around 800ns. The reset pulse is anything over about 50us.
I'd like to use some nice clocked signal coming out of the part to generate these pulses. A SPI output would be ideal; set the bit rate to 400ns and then send three SPI bits for each LED bit, either 100 or 110. Alas, none of the boards I've got connect the Neopixels to a pin that can be used as for SPI MOSI.
As a fallback, I tried using DMAC to toggle the GPIO outputs. Alas, on the SAMD21G part included in these boards, the DMAC controller can't actually write to the GPIO control registers. There's a missing connection inside the chip.
So, like all of the examples I found, I fell back to driving the GPIO registers directly with the processor, relying on a carefully written sequence of operations to get the timing within the tolerance required by the Neopixels. I have to disable interrupts during this process to avoid messing up the timing though.
Current Snek Neopixel API
I looked at the Circuit Python Neopixel API to see if there was anything I could adapt for Snek. That API uses 3-element tuples for the R,G,B values, and then places those in a list, one for each pixel in the chain. That seemed like a good idea. However, that API also has a lot of allocation churn, with new colors being created in newly allocated lists. Doing that with Snek would probably be too slow as Snek uses a garbage collector for allocation.
So, we'll allow mutable lists inside of a list or tuple, then Neopixel colors can be changed by modifying the value within the per-Neopixel lists.
Snek doesn't have objects, so we'll just create a function to send color data for a list of Neopixels out a pin. We'll use the existing Snek GPIO function, talkto, to select the pin. Finally, I'm using color values from 0-1 instead of 0-255 to make this API work more like the other analog interfaces.
> pixels = ([0.2, 0, 0],)
> talkto(NEOPIXEL)
> neopixel(pixels)
That make the first Neopixel a not-quite-blinding red. Now we can turn it green with:
> pixels[0][0] = 0
> pixels[0][1] = 0.2
> neopixel(pixels)
You can, of course, use tuples like with Circuit Python:
> pixels = [(0.2, 0, 0)]
> talkto(NEOPIXEL)
> neopixel(pixels)
> pixels[0] = (0, 0.2, 0)
> neopixel(pixels)
This does allocate a new list though.
Snek on Circuit Playground Express
As you can see in the pictures above, Snek is running on the Adafruit Circuit Playground Express. This board has a bunch of built-in hardware. At this point, I've got the buttons, switches, lights and analog input sensors (temperature and light intensity) all working. I don't have the motion sensor or audio bits going. I'll probably leave those pieces until after Snek v1.0 has been released.
Snek and the Amusement Park
(you can click on the picture to watch the model in action)
Here's an update to my previous post about Snek in a balloon. We also hooked up a Ferris wheel and controlled them both with the same Arduino Duemilanove compatible board. This one has sound so you can hear how quiet the new Circuit Cube motors are.
Snek on the Arduino Mega 2560 Rev3
The Arduino Mega 2560 Rev3 is larger in almost all ways than the ATmega328P based Arduino boards. Based on the ATMega 2560 SoC, the Mega has 256K of flash, 8K of RAM and 4K of EEPROM. The processor and peripherals are compatible with the ATMega 328P making supporting this in Snek pretty easy.
ATMega238P to ATMega2560 changes
All that I needed to do for Snek to compile for the Mega was to adjust the serial port code to use the Mega register names. gcc-avr prefixes all of the USART registers with 'USART0' for the 2560 instead of 'USART'. With that change, Snek came right up on the board.
GPIO Changes
To get the Arduino Mega pins all working, I had to add definitions for all 70 of them. That's a lot of pins! I took the definitions from the Arduino sources and matched up all of the PWM outputs as well.
USB Serial Adventures
The Arduino Duemilanove uses an FTDI USB to Serial converter chip, while the Arduino Mega uses an ATmega 16u2 SoC. The FTDI exposes a custom USB device while the ATmega16u2 implements a standard CDC ACM device.
The custom USB device provides full serial control, including support for selecting XON/XOFF flow control. The CDC ACM standard only exposes configuration for RTS/CTS flow control, but doesn't provide any way to ask for XON/XOFF flow control.
The Arduino programming protocol requires a transparent 8-bit data path; because the CDC ACM standard doesn't provide a way to turn XON/XOFF on and off, the ATmega 16u2 never does XON/XOFF.
Snek needs XON/XOFF flow control to upload and download code over the serial link.
I was hoping to leave the ATmega 16u2 code and ATmega 2560 boot loader alone. This would let people use Snek on the Arduino Mega without needing a programming puck. And, in fact, Snek works just fine. But, you can't use Snekde with the Mega because getting and putting code to the device ends up with corrupted data.
So, I changed the ATmega 16u2 code to enable XON/XOFF whenever the baud rate is below 57600 baud, left Snek running at 38400 baud while the boot loader uses 115200 baud. The result is that when Snek runs, there is XON/XOFF flow control, and when the boot loader runs, there is not.
Results
With the extra ROM, I was able to include all of the math functions. With the extra RAM, the heap can be 6kB. So much space!

